NextCloud is a perfect replacement for Owncloud cloud storage software. It has both an open source community version and a paid business version. NextCloud also provides the same server-client structure as Owncloud and supports many extensions. Users can install NextCloud Community Server version on PC or server to create local cloud memory in the home.
NextCloud client application is available for Windows, Linux , MacOS, as well as iOS and Android smartphone platforms. So, this is a cross-platform cloud storage with modular structure, with capabilities that can be expanded using plugins or extensions provided by NextCloud. There are more than 200 extensions like calendar (CalDAV), contacts (CardDAV), URL shortener , stream media (Ampache), bookmark service, image collection, RSS reader, document viewer Data, browser-based text editor, connect to Dropbox , Google Drive , Amazon S3 and more.
NextCloud's interface is easy to use and user friendly. Here in this tutorial, we will see how to install NextCloud on Windows 10 without using XAMMP, WAMP, IIS server or virtualization software like VirtualBox or VMware. The article will use WSL (Windows Subsystem for Linux) feature on Windows 10. This feature allows running Linux environment applications on Windows 10 with high performance like any original Linux server. That's why NextCloud also runs on Windows 10 very smoothly and doesn't have any problems.


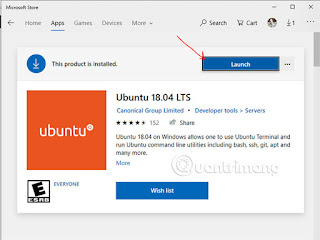
Microsoft Store will display the Ubuntu 18. application and select it, then use the Launch button .
After launching the Ubuntu Linux environment , it will take a while to set up.
sudo apt-get install apache2 mysql-server libapache2-mod-php7.2
sudo apt-get install php7.2-gd php7.2-json php7.2-mysql php7.2-curl php7.2-mbstring
sudo apt-get install php7.2-intl php-imagick php7.2-xml php7.2-zip
Because NextCloud does not provide a repository like Owncloud to download server files directly, there are two options to download via SNAP or directly from the website.
Unfortunately, SNAP (Snapcraft) still can't work on Windows Subsystem for Linux systems, so it can't be used here. The other option is through the download page.
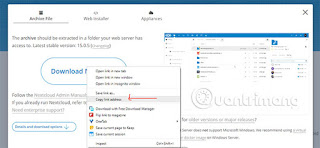
On Nextcloud page, right-click the Download button and copy the link address.
Now go to the Ubuntu window (WSL) and type wget, then right-click to paste the link.
wget https://download.nextcloud.com/server/releases/nextcloud-15.0.5.zip
sudo apt install unzip
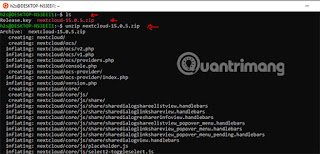
View downloaded files:
ls
Extract files:
unzip downloaded_file name
In the case of example, the file name is downloaded as nextcloud 15.0.5.zip so the command is:
unzip nextcloud-15.0.5.zip
You must use the NextCloud zip file name to be downloaded.
sudo mv nextcloud /var/www/html/nextcloud/
Create Data folder inside the folder to be copied:
sudo mkdir /var/www/html/nextcloud/data
Set permissions for the Nextcloud folder:
sudo chown -R www-data:www-data /var/www/html/nextcloud/
sudo chmod -R 755 /var/www/html/nextcloud/
sudo nano /etc/apache2/sites-available/nextcloud.conf
After the above step, add the following lines to the configuration file:
DocumentRoot /var/www/html/nextcloud/
Alias /nextcloud "/var/www/html/nextcloud/"
Options +FollowSymlinks
AllowOverride All
Require all granted
Dav off
SetEnv HOME /var/www/html/nextcloud
SetEnv HTTP_HOME /var/www/html/nextcloud
ErrorLog ${APACHE_LOG_DIR}/error.log
CustomLog ${APACHE_LOG_DIR}/access.log combined
To save and exit files, press CTRL+ Oand then CTRL+ X.
Activate the new site created with the command:
sudo a2ensite nextcloud.conf
sudo apt update
sudo a2enmod rewrite
sudo a2enmod headers
sudo a2enmod env
sudo a2enmod dir
sudo a2enmod setenvif
sudo a2enmod mime
Restart Apache to make the installed modules effective:
sudo service apache2 stop
sudo service apache2 start
sudo mysql
To create a database, the article will name it nextdb, but you can put anything you want.
CREATE DATABASE nextdb;
Next, create Database user with password and assign all databases created on the right or above for it.
Note : h2smedia is the username and next @ 123 is the password. You can change them as you like. In it, nextdb is the database name created above.
GRANT ALL ON nextdb.* to 'h2smedia'@'localhost' IDENTIFIED BY 'next@123';
Wipe out privileges so that MySQl can recognize changes and then exit.
FLUSH PRIVILEGES;
exit
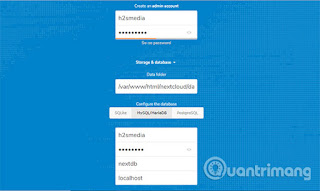
Enter the username and password you want to assign to the Nextcloud admin account. And then below, enter the details of the database you created above, then click the Finish Setup button . All operations completed.

Above is how to install NextCloud server cloud storage in Windows 10 without installing any other software like WAMP or XAMMP.
Hope you are succesful.
NextCloud client application is available for Windows, Linux , MacOS, as well as iOS and Android smartphone platforms. So, this is a cross-platform cloud storage with modular structure, with capabilities that can be expanded using plugins or extensions provided by NextCloud. There are more than 200 extensions like calendar (CalDAV), contacts (CardDAV), URL shortener , stream media (Ampache), bookmark service, image collection, RSS reader, document viewer Data, browser-based text editor, connect to Dropbox , Google Drive , Amazon S3 and more.
NextCloud's interface is easy to use and user friendly. Here in this tutorial, we will see how to install NextCloud on Windows 10 without using XAMMP, WAMP, IIS server or virtualization software like VirtualBox or VMware. The article will use WSL (Windows Subsystem for Linux) feature on Windows 10. This feature allows running Linux environment applications on Windows 10 with high performance like any original Linux server. That's why NextCloud also runs on Windows 10 very smoothly and doesn't have any problems.
Step 1: Enable WSL on Windows 10
WSL (Windows Subsystem for Linux) is available on Windows 10 and you only need to enable it. To do that, the user must go to Control Panel> Programs> Turn Windows feature on or off .
Step 2: Download the Linux environment application from Microsoft Store
To install NextCloud on Windows 10, you first need a Linux application from Microsoft Store. Go to the Windows search box and enter Microsoft Store. When it appears, click on it and search for Ubuntu 18.
Microsoft Store will display the Ubuntu 18. application and select it, then use the Launch button .
After launching the Ubuntu Linux environment , it will take a while to set up.

Step 3: Install Apache + PHP + MySQL / MariaDB for NextCloud
Run the following commands to install Apache with MariaDB and PHP 7.2sudo apt-get install apache2 mysql-server libapache2-mod-php7.2
sudo apt-get install php7.2-gd php7.2-json php7.2-mysql php7.2-curl php7.2-mbstring
sudo apt-get install php7.2-intl php-imagick php7.2-xml php7.2-zip
Step 4: Download and install NextCloud server on Windows 10
To download the latest version of NextCloud, you need to access the official download page here .Because NextCloud does not provide a repository like Owncloud to download server files directly, there are two options to download via SNAP or directly from the website.
Unfortunately, SNAP (Snapcraft) still can't work on Windows Subsystem for Linux systems, so it can't be used here. The other option is through the download page.
On Nextcloud page, right-click the Download button and copy the link address.

Now go to the Ubuntu window (WSL) and type wget, then right-click to paste the link.
wget https://download.nextcloud.com/server/releases/nextcloud-15.0.5.zip
Step 5: Extract the NextCloud server file
Unzip the Nextcloud zip file and then move the file to the web folder.sudo apt install unzip
View downloaded files:
ls
Extract files:
unzip downloaded_file name
In the case of example, the file name is downloaded as nextcloud 15.0.5.zip so the command is:
unzip nextcloud-15.0.5.zip
You must use the NextCloud zip file name to be downloaded.

Step 6: Copy Nextcloud files into Apache web directory
After unpacking, it's time to move the Nextcloud folder to / var / www / html. The command to use is:sudo mv nextcloud /var/www/html/nextcloud/
Create Data folder inside the folder to be copied:
sudo mkdir /var/www/html/nextcloud/data
Set permissions for the Nextcloud folder:
sudo chown -R www-data:www-data /var/www/html/nextcloud/
sudo chmod -R 755 /var/www/html/nextcloud/
Step 7: Create a new configuration file named nextcloud.conf
Now, we will create the Apache configuration file for NextCloud, let Apache know how to allow users to access cloud memory. For this purpose, create a configuration file called nextcloud.conf. The command to use is:sudo nano /etc/apache2/sites-available/nextcloud.conf
After the above step, add the following lines to the configuration file:
DocumentRoot /var/www/html/nextcloud/
Alias /nextcloud "/var/www/html/nextcloud/"
Options +FollowSymlinks
AllowOverride All
Require all granted
Dav off
SetEnv HOME /var/www/html/nextcloud
SetEnv HTTP_HOME /var/www/html/nextcloud
ErrorLog ${APACHE_LOG_DIR}/error.log
CustomLog ${APACHE_LOG_DIR}/access.log combined
To save and exit files, press CTRL+ Oand then CTRL+ X.
Activate the new site created with the command:
sudo a2ensite nextcloud.conf
sudo apt update
Step 8: Command for additional Apache configurations
Activating the following modules to Nextcloud can work properly:sudo a2enmod rewrite
sudo a2enmod headers
sudo a2enmod env
sudo a2enmod dir
sudo a2enmod setenvif
sudo a2enmod mime
Restart Apache to make the installed modules effective:
sudo service apache2 stop
sudo service apache2 start
Step 9: Create MySQL / MariaDB database for NextCloud
At the present time, we have done almost everything related to installing web servers for the cloud. The next step is to create the database with the following command:sudo mysql
To create a database, the article will name it nextdb, but you can put anything you want.
CREATE DATABASE nextdb;
Next, create Database user with password and assign all databases created on the right or above for it.
Note : h2smedia is the username and next @ 123 is the password. You can change them as you like. In it, nextdb is the database name created above.
GRANT ALL ON nextdb.* to 'h2smedia'@'localhost' IDENTIFIED BY 'next@123';
Wipe out privileges so that MySQl can recognize changes and then exit.
FLUSH PRIVILEGES;
exit
Step 10: Set up and configure NextCloud server on Windows 10
Finally, access the browser and enter http: // localhost / nextcloud or http: //127.0.01/nextcloud. A database setup page and NextCloud account will be opened.Enter the username and password you want to assign to the Nextcloud admin account. And then below, enter the details of the database you created above, then click the Finish Setup button . All operations completed.


Above is how to install NextCloud server cloud storage in Windows 10 without installing any other software like WAMP or XAMMP.
Hope you are succesful.


Không có nhận xét nào